I haven't done any barbecue in a number of weeks. Several factors have conspired to bring about this sad state, which I suspect will turn around over time.
That has not kept me from watching the travel and food shows I love, or reading the several cooking blogs I have come across in my short blogging career. I continue to think about food, about food preparation and especially about eating.
Even in my on-line computer game, World of Warcraft, I do cooking. Yes, the cartoon characters we players drive around collect recipes and food items and cook things useful in the game. I compulsively do one quest as often as possible to try to obtain a rare cake recipe.
In real life I must eat, and eating sometimes is more pragmatic than artful. Take, for example, the humble frozen burrito. I have consumed a great many of these over the years. They are cheap and relatively tasty.
Not always tasty enough, however. That is how I came up with Base Line Sauce. I was preparing to eat two burritos from the freezer and wanted to make them more interesting.
I combined:
1/3 cup soy sauce
1/3 cup rice wine vinegar
1/3 cup brown sugar (lightly pressed.)
1/3 cup water
1/8 tsp. cayenne pepper
in a sauce pan. I brought it to a boil, carefully combining the ingredients. I set the heat on low to simmer, and reduced the sauce to a light syrup.
I then prepared the burritos using a microwave following the instructions on the label. Once hot I cut the burritos into bite sized pieces and drizzled the sauce over them.
I then returned to my game of World of Warcraft and enjoyed the simple meal as I directed my animated alter-ego around an imaginary world.
I found this sauce serviceable, but a bit strong on the side of the soy sauce. I might reduce the amount of soy sauce next time, but I am also considering adding some fruit juice. Perhaps something citrus.
As I said, it is a base line. Something to start from that is simple and consistent.
Thursday, December 11, 2008
Tuesday, November 11, 2008
Adobo!
I found, in the comments on a prior blog relating to soy sauce and vinegar, a comment by Xeixeiniii. She described the soy sauce and vinegar as adobo, a Filipino sauce.
So, I checked with the most modern repository of knowledge and wisdom, Wikipedia. I found an entry for adobo that is deliciously descriptive. Like most sauces adobo has many forms. It really looks like a fun sauce with which to experiment.
My barbecue for this last weekend was a boneless beef rib roast. At four and a half pounds it took about four hours to cook. I had two cloves of garlic left from the lamb I did the week before, and cut slivers to insert into the roast. I then rubbed it with olive oil and sprinkled a moderate coating of my standard spice rub. That is a spicy seasoned salt, course salt and black pepper, in equal portions.
It turned out rather nicely. The family enjoyed it, and there was fair amount left for adding to spaghetti sauces and other applications.
If there is any left when I get home later this week it will probably be a bit dry. However, I suspect I can cobble up an adobo to cook it in that will revive this delicious meat and provide at least one more meal.
I certainly want to experiment with adobo in several of its incarnations.
I will take notes.
Monday, October 27, 2008
Leg of Lamb-
As I said before, I wanted to get a bit more adventurous. So, since my wife Linda was going to the store I suggested a leg of lamb. I had been reading the lamb section of The Barbecue! Bible, and thought the Cape Town Lamb sounded interesting.
The recipe in the book recommended a six pound bone-in leg of lamb. I suggested that it could be a bit smaller, since we were feeding three to four people. I also had Linda pick up some of the ingredients I did not have on hand.
The lamb she brought home was boned and wrapped in butcher's netting for roasting. It was about four and a half pounds. A bone-in was just not available. It looked quite nice. Some of the other ingredients were not available, so I made one or two adjustments.
Advance Preparation
3 to 8 hours for marinating the meat
For the lamb:
1 bone-in leg of lamb (6 to 8 lbs), trimmed of any papery skin
6 cloves of garlic, cut into thin slivers
6 thin slices peeled fresh ginger, cut into thin slivers
For the glaze:
1/4 cup Worcestershire sauce
1/4 cup soy sauce
1/4 cup firmly packed brown sugar
3 Tbsp Dijon mustard
2 Tbsp hot Chinese-style mustard, or 1 Tbsp dry mustard
3 Tbsp fresh lemon juice
3 Tbsp vegetable oil
3 cloves garlic, minced
1 Tbsp minced peeled fresh ginger
Salt and freshly ground pepper
1. Prepare the lamb: Using the tip of a sharp paring knife, make slits about an inch deep all over the surface of the lamb. Insert a sliver each of garlic and ginger into each slit. Place the lamb in a nonreactive roasting pan and set aside while you prepare the glaze.
2. Make the glaze: Combine the Worcestershire sauce, soy sauce, brown sugar, Dijon and Chinese-style mustards, lemon juice, oil, and minced garlic and ginger in a small, heavy saucepan and bring to a boil over medium heat, stirring to dissolve the sugar. Cook the glaze until thick and syrupy, about 3 minutes, stirring frequently to prevent sticking. Remove the glaze from the heat and taste for seasoning, adding salt and pepper as necessary. Let cool to room temperature.
3. Pour half of the cooled glaze over the lamb in the roasting pan, brushing to coat it on all sides. Cover and let marinate, in the refrigerator, for 3 to 8 hours (the long the better). Refrigerate the remaining glaze, covered.
4. Set up the grill for indirect grilling, place a large drip pan in the center, and preheat the grill to medium.
5. When ready to cook, place the lamb on the hot grate over the drip pan and cover the grill. Cook the lamb until done to taste, 2 to 2 1/2 hours; when done to medium, an instant-read meat thermometer inserted in the thickest part of the leg (but not touching the bone) will register 160 F. Start brushing the lamb with the remaining glaze during the last 45 minutes of grilling; brushing it two or three times. If using a charcoal grill, you’ll need to add 10 to 12 fresh coals to each side every hour.
6. Transfer the lamb to a cutting board and brush it one last time with glaze, then let rest for 10 minutes before carving. While the lamb rests, heat any remaining glaze to serve as a sauce with the lamb.
That's the recipe. How it went in my kitchen was a bit different, but not radically so. I slivered the garlic and set the pieces in a bowl. Lacking fresh ginger I liberally sprinkled the cloves with a powdered ginger, newly purchased. These I inserted in slits in the meat as described above.
The glaze I made using the recipe but substituting the powdered ginger (about a generous teaspoon full) and using the powdered dry mustard rather than Chinese style. It cooked out very nicely and required no more salt or pepper. I really liked this sauce and will work with it in the future. It has some real potential for experimentation.
The lamb was coated with the glaze and left overnight in the refrigerator in the recommended non-reactive container. In this case a glass roasting pan and cover.
The next day I prepared my Char-Broil Silver Smoker by getting a good load of Kingsford Mesquite briquettes going in my starter chimney. I have been getting a good pre-heating going before introducing the meat. Several sources, including The Barbecue! Bible, recommend cleaning and lubricating a hot grill. Once I had the grill hot and clean I placed the leg of lamb in the center of the cooking chamber and inserted the thermometer probe.
I planned for about four hours of cooking. I have found checking the fire every twenty minutes or so proves best with the Kingsford fuel in my barbecue. When most of the fuel is heavily ashed and about fifty per cent burned I introduce a fresh load of briquettes. I cover about eighty per cent of the fire surface with fresh fuel. I load them on without pre-lighting. So far this has not produced any off-taste that I can detect.
At about three and a half hours of cooking the temperature had stalled at close to 150 degrees. I loaded on an extra amount of fuel to bring the temperature up. Since I was going to have to open the cooking chamber to brush on more glaze toward the end of the cooking process I wanted a little extra heat to compensate for what would be wasted.
My target temperature was 160 degrees. The final glazing completed and the fourth hour approaching I decided the 158 degrees achieved would be sufficient. It had been a nice, long and slow cooking, and I was ready to eat.
I pulled the meat off of the grill and tented it with foil. I let it rest for almost fifteen minutes. Transferred to the cutting board the lamb looked delicious. I sliced it thin, trying to make even diagonal cuts. It was tender and smelled fabulous.
Having heated the remaining glaze for use as a sauce I served the Cape Town Leg of Lamb. Fabulous! Within twenty minutes everyone in the family had had their fill. I had very little left to put away for a left-over snack. Drizzled with the heated glaze this was one fine dish of lamb.
This was a fun adventure, and worth the investment. However, at $25 plus most of a ten dollar bag of charcoal it is much more expensive than our previous barbecue adventures. I hope to work with lamb again, but will probably focus on lesser expensive cuts of meat most of the time.
After all, much of the history of barbecue has been an effort to make inexpensive cuts of meat not just palatable, but delicious. Now that is an adventure!
Monday, October 6, 2008
Pork Chops!
I decided to grill some pork chops. I set up for direct/indirect grilling. I got a nice fire in the fire box, and dropped the grill in place. I generally run the fire box without the grill to give me room to easily add charcoal and wood chips and bits.
The pork chops I rubbed with my personal mix. I blend equal portions of zesty seasoned salt (from the Dollar Tree), black pepper, and kosher salt in a shaker with good sized openings in the lid. I did a light dusting on each side of each chop, patting the mix into the surface of the meat.
A note on the zesty seasoned salt. It has a good overall flavor, with a bit of pepper and citrus salt detectable in the mix. I rather like the light citrus tang. Generally my blend provides good seasoning without being overwhelming.
I seared the chops on the fire box grill, and then transferred them to the smoke box to finish via indirect heat. I removed the grill from the fire box so that I could shape the fire to my liking. I prefer to rake the coals over close to the opening into the smoking chamber. I use a garden hand rake for the job. I also keep a garden trowel nearby for moving charcoal and debris.
There was a small error in my cooking I want to note. In placing the chops in the smoking chamber I got the thinner pieces too close to the intake from the fire box. Some of the edges charred. Fortunately, some family members consider this a good thing. However, I think I will be more careful with placement of thinner pieces in the future.
One new thing I tried with these pork chops was individually wrapping them before placing them in the freezer. This way I could pull just the number I was going to cook and spread them out in the refrigerator to thaw. I got an even thaw on each piece this way.
On the whole another very nice barbecue, late in the season.
Friday, October 3, 2008
Something new-
Not that I have something new. Recently I did another pork shoulder roast, and it turned out very nice. Some of the family asked me to back off on the spices a bit, so I lightened up. With pre-seasoning the meat before cooking there is always the risk of going overboard.
I am thinking that I need to actually plan some more adventurous cooking. I love the standard cuts of meat, and I really like the way the Char-Broil Silver Smoker makes cooking relatively easy. However, I intended this barbecue adventure to be adventurous. So, I must explore some ideas and try some new things.
Tomorrow, provided the predicted rain in our area is not too bad, I will do some pork chops. I have done steaks and chops via indirect heat several times, and really like the infusion of the smoke flavor. I will probably drop the grill grate onto the fire box and do a little direct heat to finish.
I am still seeking sources of charcoal and wood that might be a bit less expensive. So far the bags from the local Safeway are as reasonable as I can find. Most of the specialty houses on the Internet are a bit pricey. Name brand apple wood? Hmmm.
My vacation starts in a few days. I will be away for about two weeks. Heading to Medford, Oregon. I will, of course, keep my eyes open with regard to all things barbecue. I might find something interesting to share.
Sunday, September 21, 2008
The Slow Season-
I have the privilege of living in a part of the world that will permit outdoor cooking most of the year, in reasonable comfort. That being said, I have had a bit of a slow-down in grilling and barbecue.
We had some boned chicken breasts in the refrigerator, and I really did want to give them a nice smoking. I did three of them with Rudy's rub, purchased from Rudy's Barbecue when we were in Texas a few weeks back. The other two I did with my usual rub of seasoned salt, salt and black pepper.
I figured about an hour and a half for the cooking. I prepped the barbecue, got the fire going, heated the smoke chamber and laid out the meat. As usual I applied the thermometer probe in the piece furthest from the fire.
Generosity with fuel seems to be the key to good cooking time and a quality product with the Char-Broil Silver Smoker. Most of my cooking is with the vents wide open, keeping the smoke chamber at around 250 degrees. I have not needed to use a bellows since applying the rule of generosity.
My estimated time was about right. To finish this batch I raked the coals into a pile at the back of the fire box and put the fire box grill in place. I gave the pieces about two minutes per side of direct heat before taking them out and serving them.
My fuel was again Kingsford Mesquite charcoal. I applied no additional smoke chips. I prefer the Mesquite because I really like the more aggressive smoke flavor. I think it worked well for this batch. Juicy, and well balanced between spices, smoke and chicken flavors.
I am thinking about that Thanksgiving Turkey. Hmmmm. Maybe a test run in a week or two?
Thursday, September 11, 2008
Pork Shoulder Roast-
It was a relatively small Pork Shoulder Roast. It looked good. Nice balance of fat and lean, and just the right size for the remaining charcoal I had in stock. Cash was a bit short, so the six dollar price was good. I couldn't afford more charcoal, so what I had would have to do.
I rubbed the meat with olive oil and then added my spices. I am still working with the seasoned salt/salt/black pepper mix that has done so well in the past.
The charcoal was loaded into the starter chimney and fired up. The balance of the charcoal was divided between two coffee tubs. I find setting up my fuel in handy containers is, well, handy. I can just grab a tub of charcoal and pour some in whenever the fuel seems to need refreshing. Handy.
I set my thermometer for 165 degrees. I cleaned the heated grate and added the meat. I figured I had enough fuel for three hours. That seemed about right. The charcoal was the remains of my bag of Kingsford Hickory. I had no extra chips, but this charcoal has hickory bits in the charcoal itself, and proved adequate.
At the end of the three hours (adding charcoal every forty five minutes or so) I had used all of my fuel and the heat was declining. My temperature was 154 degrees inside the meat. I could see we weren't going to reach the target temperature, so I set my kitchen oven for 275 degrees and let the meat continue to cook in the barbecue until it preheated.
I transferred the meat to the oven and it reached temperature in fifteen minutes. The end product had a good smoke flavor and was quite juicy. It was very tasty, and quite satisfactory considering the price.
I think the combination of smoker and oven is a good choice when the supply of charcoal is not adequate, and might also be used to shorten the cooking time if you don't have as much time for slow cooking as you might like. I don't know the minimum amount of time necessary to establish a good smokey flavor using the smoker, but some seems to be better than none.
Pretty much just use what you have, and do the best you can with that. Try something new now and then, and learn from your mistakes. So far I haven't had many of those, and my meals have been surprisingly good.
Most important of all, I have had fun.
Monday, August 18, 2008
Bacon Grilled Prunes-
Yes, it is from The Barbecue! Bible. I had some steaks to grill, and I wanted to try this. The prunes (pitted) were wrapped in bacon, skewered, and grilled. Simple. Very interesting. The juxtaposition of salt, fat, and fruity sweetness is really intriguing.
The steaks were another matter. Beef steaks, bone-in. I have not really mastered the direct grilling of steaks. I oiled them with olive oil, and rubbed them with my seasoning. I cooked them rare. Very rare.
Now, I like rare beef. These were very good. However, I still need to build confidence in direct grilling so that I can achieve various levels of doneness. I am not there.
Fortunately, there is an answer. Grill more steaks! A lot more.
While I am training, I might as well keep making those bacon grilled prunes! Mmmmm!
Monday, August 11, 2008
Chicken and Beef-
We were a bit short on groceries when we got home from Texas, so my wife went shopping. Among other things she brought home two chickens and a small beef roast. She also bought a small bag of charcoal.
I got the coals started using my chimney and little alcohol pan. The charcoal was Safeway brand, and I found it strong in petroleum odor when starting. I let the coals get going well, and while they were getting started I prepared the chicken and beef.
The beef received my usual olive oil rubdown, and a coating of the spice blend I have been using most often. That is salt, zesty seasoned salt, and black pepper.
I removed the backbone and breastbone from the chickens, similar to a spatchcock but actually splitting the birds. I prepared them with oil, and then a coating of Rudy's Poultry Seasoning. A little thing I picked up in Texas.
I kept the bit of fat that sits just inside the birds and used that to oil my grill. It worked well, and I tossed them on the grate to cook with everything else. They made great doggy treats.
The beef roast I placed nearest the fire, with the fatty side closest to the port. The chicken halves I laid out on the grill, and set the thermometer probe into the breast of one of the birds furthest from the fire. I set my temperature marker for 170 degrees.
After they had been cooking about a half hour I checked the fire. It was burning down a bit, so I added a load of charcoal. I was concerned that the petroleum might taint the meat, but had experienced success in just dropping the fresh charcoal right on the fire with the Kingsford brand. I did the same this time, and noticed no off flavors. This proved to be adequate fuel for this burn.
The charcoal had some hickory in it, and I added soaked hickory chips periodically to improve the smoke. It was good smoke, though I find I am more partial to mesquite. I still need to try oak and some fruit woods. These tend to be less available and more costly, so my budget restricts the experiments at this time.
Two and a half hours later I had a nice piece of beef and two cooked chickens. Once again, quite tender and flavorful. The beef had been a bit lean, and had I some bacon it would have been good to apply some to provide a bit more fat for the cooking. Even so, it turned out quite nicely.
We served it with a green salad, some Bush's baked beans, and I had a Bodington's Pub Ale to wash it all down. A very satisfying meal.
The following day I chopped up equal portions of beef and chicken, and put them into the green salad. I topped it with a California dressing. It was very good, lacking perhaps only a sprinkling of grated cheese. Something sharp and tangy. Still, it was a very nice lunch.
While in Texas I bought some Lodge dutch oven gloves from Bass Pro Shop, to use with the barbecue. These are well suited to the task, replacing the leather work gloves I had been using. One can handle some very hot items with these gloves, and they are long enough to provide good protection to the forearm.
Bit by bit I am adding tools and techniques to my barbecue experience. I long to explore spices, herbs and sauces in greater depth. So many ways to prepare food with live fire! This is truly a barbecue adventure!
Rudy's Barbecue-
One barbecue pundit on the Travel Channel said, "Barbecue is a destination." This inferred that real barbecue is best done by professionals in a place dedicated to the art. While I enjoy my efforts in learning the art, I truly enjoy finding good barbecue.
When I am in San Antonio, Texas, I really like to visit Rudy's. My favorite is the Chopped. Brisket, turkey breast, and sausage chopped fine and sold by the pound. You get a bunch of sliced white bread with which to eat it. Scoop up some chopped and put it on the bread, fold it and eat it. Fabulous!
It is great with a beer, but also really good with their sweet tea. I must have consumed two gallons of the stuff over the nine days we were in San Antonio. Along with this is some of the best creamed corn I have ever tasted.
While I like cooking barbecue, I really like eating barbecue. I could easily make a career of visiting barbecue joints and enjoying everything barbecue. Especially since it embraces sausage and beer, two other favorites of mine.
Another blogger recommended Kansas City barbecue. I long for the experience. And I can't miss Memphis. Or the Carolinas. Yep, the road is calling.
Barbecue!
Monday, July 21, 2008
Aspirations, or too much of a good thing?
I found this on the Bass Pro Shop site. I hope to see one when I am in San Antonio next week. I can't pass up a trip to Bass Pro Shop. It's just too much fun!
Letting Your Meat Rest-
I talk a lot about barbecue with my work associates. Most are unrepentant carnivours. Not necessarily unreformed, but unrepentant. We love meat, even those of us who are being compelled to cut back due to weight and high cholesterol.
One of my associates, Kevin Fisher, shared something he has been doing to rest his meat. Ahem. That is, to let the meat rest for a time after taking it off of the fire and away from the source of heat. This purportedly allows the juices to even out through the meat and improve the flavor.
The tool he uses is an Igloo cooler. Lined with aluminum foil, the cooler becomes a hot box when meat is placed inside and the lid closed. Using the Igloo in this manner allows the meat to be cooked and then to rest in the hot box. Other meats may be prepared, and later added to the insulated box. It all stays hot until ready to serve.
Brilliant!
Kevin claimed to have learned this from a friend while attending a barbecue. This friend used a different colored box for different meats, and always used the same box for the same kinds of meat. Inexpensive, and a very good idea.
Keven even said he could do the meat, then grill the vegetables and get the sides all ready while the meat rested in the Igloo. The grilled vegetables could be added to the meat to stay warm until time to serve.
I really like this idea. One of the problems with low-and-slow cooking has been coordinating the cooking times. Now it will be easy!
Saturday, July 19, 2008
Pork Rib Roast-
That's what the label said. Five nice chunks of pork. Good looking fat. Nice meat. I liked the texture. Four pieces had bone in. I judged a two hour cooking time, and set up for that.
My spices were a blend of Dollar Tree Zesty Seasoned Salt, Black Pepper, and table salt in equal portions. I blended them in a little shaker we had around the kitchen. The meat was rubbed with oil, and the seasoning applied. I think it applied more evenly than with sprinkling by hand. I was generous, but not as extreme as the last two barbecues. Those tasted just a bit salty.
I got the fire going, and the meat on the cooking grill. I monitored at the usual 30 minute intervals, adding coals and wood chips as I went along. I did some reading during this time, and enjoyed the afternoon.
The results were quite tasty. The meat was as good as it had looked. The fat had cooked down, and flavored the meat very nicely.
My only particular note is to be generous with the fuel. With the Silver Smoker, I have learned that the temperature declines if the fuel is not abundant. I would advise loading on the fuel, and adjusting the temperature with the vents if necessary.
I still have not found a good source for charcoal in bulk. So far I have been satisfied with the performance of the Kingsford brand of charcoal. I get more consistent temperatures with this product than the lump charcoal, and it is more readily available.
One thought for the future is to set out the charcoal in some small buckets to aid in adding fuel. Do a check, dump in the prepared bucket of fuel. No digging in the bag, no pouring from the bag and getting too much in the fire box.
So far I have not been pre-lighting my charcoal when I add it to the fire box. I just dump in the unlit charcoal and move it around. Since the firebox is offset from the cooking chamber, I don't have to shape the fire as much as would be necessary on a kettle grill.
I am due for some new gloves. I will probably get some good gloves in the next few weeks.
Well, that's all for now. I think I am ready to begin experimenting a bit. I seem to have the basics down, and it is time to have some real fun!
Friday, July 11, 2008
Beef and Chicken-
The other day it was a beef roast and a Cornish game hen. I did my oil and rub. Set things up in the usual way. Cooked for four hours. Turned out good. Quite good, actually.
The only change this time was to feed fuel more regularly. Every thirty minutes I checked the fire, added hickory chips, and added briquettes. As a result, I got very good and consistent heat. I reached temperature at around three hours, and let it ride the last hour. I kept the fuel level up, and the finish was very good.
I have chopped up about half of the beef and chicken, and mixed them in a bowl to use as chopped meat over a couple of days. I did a barbecue spaghetti, which was pretty good. I was surprised to find a barbecue restaurant (mentioned on the Travel Channel) was also doing barbecue spaghetti. They use their barbecue sauce (proprietary) as the spaghetti sauce, as well as using their barbecued meat.
Soon I hope to find the time and resources to explore creating my own sauce. I plan to begin with an apple and an onion. I am not yet sure what I shall add to that.
One step at a time.
Wednesday, July 2, 2008
Barbecue Design-
Most recently competitive barbecue masters have addopted the oil drum as a cooking instrument. Standing upright, with a wire mesh fire box at the bottom and a grill at the top, and a vent pipe which draws air into the fire zone at the bottom of the structure.
The fire boxes are ingenious. Mesh boxes with a mesh floor that could be moved up or down in the box to allow for more (or less) fuel. These are loaded with charcoal and placed in the bottom of the drum. They are generally ignited by a blow torch with an extension to reach the bottom of the drum.
The grate is near the top, just enough below the top to allow a lid to be placed on the assemby when the meat is in place. The lid has a smoke vent, with a cap to restrict the outflow of smoke.
Most are manufactured by the user from actual oil drums. One fellow I saw using such a device in a video was proud of the fact that the unit had cost him two dollars. I assume a serious cleaning takes place before these recycled oil drums are put into service.
The commercially produced units are drums that never contained oil, or anything else. They are new drums.
Now, I had a thought on this. If the drum were cut around the circumfrence about a foot from the bottom, the lower section would be available as a fire ring. If metal tubes were welded on at fixed distances around the circumfrence of both the top and bottom sections the units could be locked back together. To aid in this I would weld a strip of metal to the bottom of the top section along the inside circumfrence to aid in aligning and joining the two halves.
This access to the bottom of the drum would make lighting the fuel easier. Placing the fuel would even be easier. Plus, used as a fire ring, rods of metal could be placed into the tubes used to lock the two parts together and used to hold meat in place to roast beside the fire.
If one wished to do some dutch oven cooking, the tripod could be affixed to these points as well. The fire would be contained. The ash and other remains of the fire could be carried away with the rest of the gear, leaving a campsite clean and clear.
If I get around to drawing this up, I will place my drawings here.
At the present cost of these new drum smokers, I won't be buying one anytime soon. However, they are intriguing, and certainly I shall keep them in mind when I am ready to replace my Silver Smoker.
Tuesday, July 1, 2008
More barbecue chicken-
I have gotten tired of chicken over the years. Uninspired baked chicken. Uninteresting chicken breasts prepared in a "oh, well, we might as well have chicken" kind of way. Boring chicken.
However, the barbecue has given chicken a new excitement. I already did chicken in a previous post, so I will simply relate what I did different this time.
I was looking at my Barbecue! Bible and saw a way of preparing the chicken. In essence it was a matter of cutting out the backbone and the breastbone to be able to lay out the chicken flat on the grill. The technique was a bit more fancy than what I did. I just cut as much away as I could on either side of each bone using kitchen shears, and then finished the cuts with my cleaver.
The halves flattened out quite nicely. No real loss of meat, and the cut-off could be used for stock.
I used my olive oil to prep the birds. I rubbed them down with Zesty Seasoned Salt (from the Dollar Tree), pepper and salt mixed in equal portions.
The charcoal I started in the chimney using my alcohol igniter. Got a good bed going. Laid out the birds (nice and flat.) Inserted the thermometer and sat back to read The Barbecue! Bible.
I paid closer attention to my fire over the course of the next two and a half hours. I have been loosing heat toward the end of my cooking time, and wanted to see what I was doing wrong. Early on I add briquettes as I tend the fire, adding soaked wood chips when I do so. However, I noticed that I was misjudging the state of the fire toward the end of the cooking time.
The coals had a good ash, and were glowing red deep inside the pile. The box seemed hot, so I didn't add any fuel toward the end. My temperature (inside the meat) was running steady at 160 degrees, when my target was 165 degrees. I finally added some more fuel and eventually got to target temperature.
What I figure I am doing wrong is allowing the charcoal to burn away enough fuel that it just does not have enough energy to pump out that last bit of heat. The ash was growing heavy, and even though the fire box seemed hot, it was not hot enough.
So, I plan to add fuel with every check, about every thirty minutes or so. Make sure that fresh fuel is entering the cycle, to keep that heat on. Even toward the end of the cooking run, when it seems like a waste of fuel.
I finally reached temperature after about two hours and twenty minutes of cooking. My last chicken run was not quite as tender as I wanted it to be, so I closed down the vents and most of the chimney vent to hold in the heat and slow the burning of the fuel. It just seemed like a good idea.
Moist, tender, and full of flavor! We had the chicken with Bush's baked beans, and it was delicious! I see Bush has some new beans to offer to complement the grilling experience. I have to give that a try.
Beer of the day; A&W Root Beer!
Monday, June 30, 2008
Pork Rib Roast-
Pork Rib Roast. Linda picked it up because it was well priced. When I opened the package, I decided we had gotten a good deal. Seven nice chunks of pig, with an excellent balance between fat and flesh. Only one piece had any significant bone. Two pieces had a beautiful back of fat. Yes, this looked good.
Yesterday I fired up my coals, and got ready to cook. Kingsford Hickory briquettes, started in a starter chimney using rubbing alcohol in a small can as my ignition source. While the charcoal got going I went to the kitchen to prepare the meat.
A nice coating of oil, which in this case is a blend of olive oil and canola oil. I blended Zesty Seasoned salt, salt, and pepper in a bowl and gave the pieces of meat a good rub. Then I took them to the fire. After pouring the coals out from the starting chimney, I set the meat up in the cooking chamber. I placed the thermometer probe in the most distant piece from fire, and started cooking.
I figured that the meat would take at least three hours to cook. The pieces were pretty evenly shaped, and about an inch and a half thick. There was not a lot of connective tissue to break down, so I did not figure for more than four hours of cooking time.
My chair was conveniently placed for enjoying the next few hours. I had my book, and a very nice day. Every thirty minutes I checked the fire, and the cooking chamber temperature. A few briquettes every check, and a handful of hickory chips.
After two hours my temperature inside the meat was 140 degrees. I turned the meat, just rotating each piece in place. Things were looking good.
Thirty minutes later we were at 150 degrees. I checked the fire, and decided that the coals were going well enough for the finish. I added some hickory chips, but no new charcoal. In retrospect, I should have put on another handful.
After another thirty minutes the temperature was still at 150 degrees inside the meat. I needed more heat. I have not yet gotten a bellows, but I found something as good. A battery powered air pump for my air bed. I applied it for a couple of minutes. The temperature bumped two degrees. I applied it a few more minutes. We got 154 degrees.
I waited fifteen minutes, and checked the coals. They were still nice and hot. I checked my thermometer. The meat was at 156 degrees. I ran the air pump for a bit, and we bumped to 158 degrees. I started cleaning up. We were almost there.
Moments later the alarm went off. We were at temperature. I advised Linda that we could put the corn into the boiling water. The beans were already hot. I had a look at the meat. It looked good. Once the corn was ready, so was our meat. I took it off the barbecue and took it up to the kitchen.
Everyone had all they wanted. It was delicious. Great with the beans and corn. Tender and flavorful. I still had lots left over. I wrapped it up for the next day, and placed it in the refrigerator.
Today, I had barbecue pork spaghetti for lunch. Chopped the pork fine, and added it to a jar spaghetti sauce. Quite good. Dinner was chopped pork in the beans. Also quite tasty.
On the whole, a good experiences. Oh, yes. Yesterday's beer was A&W root beer.
Sunday, June 22, 2008
Lump o' Beef-
Most of the family is away this weekend. I was picking up a few things to eat over the next few days. Kielbasa and Black Beans and Rice. Oh! There's a nice piece of beef for only five dollars! Grab that!
So, I barbecued it today. Sat in the back yard, read a book, and periodically tended the meat. I used a barbecue rub I found in the Dollar Tree for only a dollar! Not bad. I tried to limit the amount of fuel to play with temperature control. It went alright, but I never reached target temperature. I planned for about two and a half hours, and toward the end it got up to 150 degrees internal. It hovered there for about the last hour. For the last thirty minutes I tossed in a piece of Kielbasa.
I felt fine with the beef sitting at 150 degrees or so for an hour. I didn't want to dry it out, so I decided that it was done. I cut it into four pieces. The ends were reserved for chopping, to use tomorrow. So was the sausage.
I ate one of the center pieces. I gave the other to my son Jon. It was just fine. Good smoke flavor. I used Kingsford mesquite briquettes along with soaked mesquite chips for smoke. The flavor was deep without being overwhelming. I was right about my timing. Any longer and the meat would have started loosing juices. It was just right.
I chopped up the rest for tomorrow. I have a box of Rice-a-Roni Mexican style that will be enhanced by the chopped beef and sausage. I figure that I will stretch that five dollar piece of meat over two or three meals for myself, and one for my son.
Something I really want to get is a bellows. I would like to have the ability to pump up the heat, and I like the personal involvement that a bellows will offer. My wife was thoroughly displeased when her hair dryer failed after I used it on the barbecue. I think it was just a coincidence.
Oh, and the beer of the day was New Belgium breweries Fat Tire. I like this ale. It has a delicate earthy flavor, with mild hopping. It has a very malty finish. Quite tasty.
I must say that visiting the meat counter wherever there is one has become fun. I only regret that I can only eat so much on any given day. I actually am having to cut back. My aging tummy can't face the challenges I gave it in the past. Now, I need to focus on quality, and enjoy anticipating the next dining opportunity.
Tuesday, June 17, 2008
Cornish Game Hens-
I doubt that they had been anywhere near Cornwall. Cornish Game Hens. Hmmm. Little chickens. I took four out of the freezer two days ago. This afternoon I was planning to cook them. Following directions in several cookbooks I have read (a little) I defrosted the little birds in the refrigerator.
So, I cleaned the Char-Broil Silver Smoker (including knocking off a bit of rust where the paint has burned off of the fire box) and used vegetable oil on my grates. I didn't have any newspaper to use to start my charcoal. This required thought. I did have an empty tuna can.
I put a quarter inch of rubbing alcohol in the can and lit it. Good flame. I let it burn. Good duration. It might work. Once it burned out I put another load of alcohol in the can and put it in the firebox. I racked up some charcoal in my starting chimney, fired up the alcohol and placed the chimney on top of the can.
My charcoal is still Kingsford briquettes, the ones with mesquite wood chunks in them. I only had a little of the hickory chips left, so I would be relying on the mesquite in the charcoal for a larger part of my smoke flavoring.
The alcohol starter worked just fine. Since I can get rubbing alcohol for a buck a bottle at the Dollar Tree, and I used about one ounce for the start, I think that this may be my regular starter from now on. At least until someone can show me it is a bad idea. Then maybe Everclear. More costly, but I can drink Everclear.
Maybe not.
So, coals going, temp rising in the smoke chamber. I opened the packages on the little birds. There was still ice in there! Hot bath, pat dry. Oil. Add my rub. (Equal parts ground black pepper, cheap seasoned salt, salt, and a bit of garlic powder.) Haul the little birds down and arrange them on the cooking surface.
The coals were going good even after forty minutes. I chucked on a few more coals, and closed the vents to about a quarter top and bottom. My cooking chamber was solid, at about 250 degrees. The fresh coals provided some smoke. After another thirty minutes I checked the fire. It was steady, even and had a good color. I added all of my soaked smoke chips.
At this point I turned the birds and adjusted their locations inside the cooking chamber to even out the cooking. I have no idea if this helps, but it makes me feel like I am cooking.
I figured another hour. I spent much of my waiting time talking with my granddaughter or reading my new barbecue book. Eventually my temperature alarm indicated that we were at temperature. I had bumped the target temp to 170 degrees, to insure we were properly done. Since we still had to wait for my wife to arrive from an errand, I closed the dampers and let them continue to cook.
After another fifteen minutes my wife got home, and I prepared to remove the birds. The skins were firm but lacked the crispness that is appealing, so I moved all four birds onto the grill over the fire in the firebox to crisp them up a touch. Just a couple of minutes, including a turn for each bird. I took them out and carried them to the kitchen.
They looked good. Plump, with a reddish brown color. Juicy. Each family member got one, and they were readily devoured. I kept a bit of my rub handy, and added a pinch or two to the meat as I consumed it.
Another winner!
What next? Who knows? I am dangerous, now. I have a little bit of knowledge. I have a modest amount of skill. My eyes are larger than my stomach, and my stomach is HUGE!
(Note: If you wish to use your rub as a table spice, don't use the same stuff you were using when preparing your birds. Use a fresh batch to avoid any cross contamination.)
Sunday, June 15, 2008
Father's Day-
Unfortunately, I am working today. However, my wife Linda made sure I got my gift before I went to work. The Barbecue! Bible by Steven Raichlen. I had glanced at it in book stores recently, but had not purchased it. Now I have it!
I have only just begun reading it. I already know that I will enjoy the reading. I love the subject matter, and the little I have read indicates that Raichlen has a very pleasant style of writing. The subject is essentially cooking with live fire. Techniques and recipes from all over the world.
Oh, yes. This is going to be fun!
Wednesday, June 11, 2008
Pork Shoulder Ham
This was a bone-in piece. Pretty much a shoulder joint. I have never prepared one of these, so it was an adventure. Just the ticket for this blog!
I rubbed it with oil and my salt and pepper mix. I set it in the very center of the cooking chamber, and fired up the coals. I am using Kingsford Mesquite Briquettes at the present. They fired up nicely and I got a good even burn right from the start. I poured out the coals from the lighting chimney, and spread them about. A few handfuls of charcoal on top, and we were off.
My temperature setting was for 160 degrees. I planned on a four hour run. Every half hour or so I added a few handfuls of charcoal and some soaked hickory chips. At two hours we were up to 140 degrees internal temperature, and the chamber was at about 250 degrees. I turned the meat, tended the fire, and anticipated another hour or so before achieving target temperature.
We reached target temperature at three hours. I had to damp down the air inlets quite a bit to keep the temperature in the cooking chamber in the zone. I decided to close it way down, letting the fire smolder with a lot of hickory chips. I closed the chimney to about 1/4 open. I usually run full open on the chimney, but I was going for optimal smoke for the next half hour.
At three and a half hours I deemed things done. I brought out the ham, and had a look. It had the skin on, and the skin was almost black. The meat exposed by the butcher's cut looked a deep red. The skin had done some shrinking, making the finished piece appear smaller than the original cut of meat.
This cut was hard carving. I cut close to the bone, but was unfamiliar with the bone structure. It took some time to separate the meat from the bone. There was a lot of fat, especially under the skin. The skin was a bit tough, as would be expected. Some of the connective tissue within the meat was still a bit tough in places.
I would like to have smoked this piece of meat for another half hour or more. However, some of the thinner bits were beginning to dry. As it was, the meat itself was juicy and tender. The fat had a deep smoke flavor. The bits of connective tissue that remained tough were few. Even discounting the bone, skin and fat, this was not a bad $4 cut of meat.
Not my best barbecue experience, but a good experience. I will consider this cut again if it looks meaty enough and the price is right. The bone would make good stock for soup, if one were so inclined. I think I would make preparations for that should I barbecue this cut again.
Tuesday, June 10, 2008
Gringo Burritos-
I have lived long on throw-together meals. Barbecue has become a part of my disordered culinary lifestyle.
Take, for example, the recent chuck steaks. Those turned out great. However, the household is most often three people. My youngest son still lives at home, but he has his own life and is not always present to consume the bounty his father provides. So, most often it is three people eating. My wife, her mother, and myself.
I have left-over barbecue in the refrigerator most of the time. A good thing, not bad.
So, I wanted a quick meal the other day. I grabbed a chunk of barbecued chuck and chopped it fine. I threw it in a sauce pan. A dash of soy sauce, a splash of rice wine vinegar. Hmm. Needs something else. Ah! An opened can of Hunts Spaghetti Sauce is in the 'fridge. I chucked some in with the chuck, and started warming it up.
We had some tortillas in the bread box. I threw a half dozen on a plate and microwaved them a bit to get them soft. Wheat tortillas, they were.
I stirred the meat and when it was steamy hot I began loading and rolling. I had enough to share with my son, who had followed his nose out to the kitchen.
Pretty quick. Very tasty. Gringo Burritos.
Fresh Meat-
I went over the shopping-freezing-barbecue thing in the prior post. This is a factor in barbecue due to the way many people live. You shop near payday, so that you have food when the money gets thin. I have always lived among people who experienced an ebb and flow in their money.
So, on thin money days it is hard to just run down to the store and pick up a nice piece of fresh meat to barbecue that afternoon. However, you don't always know when you will have a good day for barbecue. When that day comes, you may not have defrosted that fine cut of meat you want to cook up.
I did a bit of thinking. How about purchasing some of those store gift cards when shopping? Invest part of that meat budget in cards that will insure funds are available on barbecue day! Brilliant!
Now, no more problem if pre-planning did not happen, and the meat is still frozen. Grab the "meat card" and scoot on down to the store. That perfect cut can be purchased, prepared and cooking in an hour or less! No ready cash? No problem! The "meat card."
Don't leave home without it.
Frozen Meat-
Our general shopping practice is to buy all of our food at once. We get paid every other week. We shop every other week. Generally, all meat products are purchased at this time. The items that are not going to be cooked in a day or two are frozen. This is a relatively common way of managing food in a household.
Defrosting now becomes an element of the barbecue. How do I get the meat from frozen to fabulous? I did a few searches and learned that the best method is to move the meat from the freezer to the refrigerator. Out on the counter is out. Too much risk of bacteria growth. Microwave is out, due to uneven thawing and pre-cooking of parts of the meat. Submersion in hot or cold water is out, since it can make the meat soggy and impact the cooking process.
The general rule I found is about a day for every five pounds of meat. This means that the meat must be moved into the refrigerator about twenty four hours before cooking begins, in most cases. A bit longer won't hurt.
This requires planning ahead. You will have to decide what you wish to barbecue, and when. Then, in a timely fashion, the meat will have to be moved to the refrigerator.
For me, and many people I know, this is a major lifestyle change. I will try to record my success (or lack of success) as time goes on.
Thursday, June 5, 2008
Soy sauce and vinegar-
I discovered soy sauce and vinegar some years ago when I had an illness that severely restricted my diet. I was, for several weeks, eating mostly rice. Not that I was unfamiliar with soy sauce and rice. I had used soy sauce on rice before. However, blending it with vinegar had not occurred to me until I found myself in need of something to make the rice more interesting.
The combination was very good. I tried malt vinegar, rice wine vinegar, balsamic vinegar, and red wine vinegar. I suspect that I would have become quite an expert on vinegars, but my digestion got better and I was able to expand my diet.
What I learned about soy sauce and vinegar stuck with me. Now, when I chop up some barbecued meat to use in a sandwich or wrap, I chop it fine and put it in a sauce pan. To this I add a bit of soy sauce and vinegar. It is a light sauce to add moisture to the chopped meat.
I have yet to get going with marinades, but I see real potential in soy sauce and vinegar as a base. That, and beer. These just seem right. I have visions of marinades including a cornucopia of vegetables and fruits. Herbs and spices. Marinades and sauces.
Yes, I have only just begun. I see great adventures ahead.
Wednesday, June 4, 2008
Chuck Steak
Yesterday it was Chuck Steak. About an inch thick, plate-sized slabs of meat. It had nice color, and the fat seemed to be about right. So, I oiled them up and seasoned them with my usual mix of salt, seasoned salt, garlic sea salt and black pepper. I mix these in roughly equal proportions and rub them liberally into the oiled meat.
I set them up on the racks in the smoke chamber, and inserted the thermometer in the middle one. I guestimated about an hour and a half to two hours would be about right.
Since I did not have any more lump charcoal, it would be Kingsford Hickory and Kingsford Mesquite briquettes. A little harder to start, but they got hot pretty quickly when they got going. I poured them out into the fire box and threw in two more double handfuls of charcoal.
At my thirty minute check the smoke chamber was a bit over temperature. I closed the wide-open vents to about an eight open, top and bottom. The bed of coals still looked good. I threw in two handfuls of soaked hickory chips and set my timer for thirty minutes.
Thirty minutes later I was at 140 degrees, with the temperature in the chamber in the red on my dial thermometer. I turned the meat, and moved the piece closest to the fire to the far end of the smoke chamber. This brought the piece of meat that was farthest away up closest to the fire. I figured that things would balance out this way.
I bumped the bottom vent to about a quarter open, and closed the upper vent. I added some more charcoal and set my timer for twenty minutes.
The temperature was 158 degrees when I returned. I tossed on some more hickory chips, and opened the lower vent all the way. Within ten minutes I was at temperature. I closed the vents and shut down the chimney opening to about an eighth. I thought we could go about twenty more minutes with some intense smoking.
The meat looked excellent when I pulled it out twenty minutes later. It proved to be very tender and flavorful. The smoke intensity was just right in the flavor of the meat. The moisture in the meat was just right. On the whole, another successful barbecue experience.
The dog got some very nice bones. He was ecstatic. I tried to get him to post his comments, but he was too busy gnawing.
Tuesday, May 27, 2008
Observations and plans for the future-
So far my experience with barbecue in an offset smoker have been positive. I found the digital thermometer to be a great tool for monitoring the internal temperature of the meat. The dial thermometer in the smoke chamber has been adequate, but is not particularly accurate. My simple rub has also proved adequate thus far.
I would like to try fish in the smoker. I need to study this one, since I haven't done much cooking of fish other than pan-fried or baked. This will require some research.
It will be interesting to play with the rubs a bit. What I have been doing has been a very simple seasoning. I want to become a bit bolder in this area, and see what the results might be.
I need to find a source of wood. I would like to try cooking with wood rather than charcoal.
Eventually I would like to try dutch oven cooking, but I see that as a "sometime next year" kind of thing. I still have a lot to learn just with the offset smoker.
The other day I had to spend some time at the mall, waiting on a car repair that just kept going longer. Having the time, I was able to explore the outdoor living area in Sears. They had an outdoor kitchen that was quite nice. Gas grill with lots of burners. Rotisserie. A side mounted griddle. A refridgerator. Preparation space.
There was a matching outdoor fireplace for fire-side dining! Also some very nice outdoor furniture. Dinettes with umbrellas. Coolers for drinks.
There was a rather inexpensive upright barbecue as well.
My vision expanded a long way beyond my wallet. It would be very nice to be able to live so much outdoors!
Perhaps one day these dreams will become plans. For now, I think I will plan on barbecuing some fish in the near future.
Chicken
Linda, my wife, bought the chickens fresh. However, due to many factors I was unable to get them on the barbecue. So, I split them into halves and froze them.
Yesterday I was able to find the time to cook them. I had worked a night shift, and pulled them out of the freezer when I got home. I recalled that thawing was enhanced by placing the frozen meat on metal, so I set them on cookie sheets and went to bed.
I awoke after four hours and immediately got the coals going in the lighting chimney. I rubbed the meat with oil and rubbed in my blend of seasoned salt, garlic sea salt, table salt and black pepper. I then placed the chicken halves on the grill in the smoke chamber. They were still a bit firm, possibly still frozen in the middle. I wondered if that would have an impact on the cooking. I would find out.
The hot coals were poured from the chimney into the fire box. I added a good quantity of charcoal to the hot bed. When things were going good, I went into the house to do some things. I set a timer for thirty minutes. After that time had passed I checked the fire and the temperature in the smoke chamber. The fire was going good, and required just a bit of fuel to keep it going. The temperature in the chamber was in the red, which indicated a temperature around 250 degrees.
After another thirty minutes I was confident that the meat was thoroughly defrosted and I could easily insert the thermometer. I did so and found I was already at 150 degrees internal temperature. This was much faster than the other meats I have done. I added soaked hickory chips to the fire and set my timer for another half-hour.
When I returned the temperature was 195 degrees internal. The chamber was still around 250 degrees, so my fire had been steady. Things were cooking faster than I had expected. I turned the chicken over and adjusted the pieces to even out the exposure to heat. We were over target temperature, but I still wanted to smoke the meat for at least an hour. I closed the dampers down and added a good lot of soaked hickory chips to the fire.
Another thirty minutes. The chicken was now around 180 degrees internal temperature, and the chamber was holding steady. I added some fuel to the fire and put on more chips. I figured another half-hour would be good.
Thirty minutes later I opened the smoke chamber. Four half chickens were a lovely smoked red-brown. I took them out and brought them upstairs to the kitchen. Everyone helped themselves to their favorite bits. Barbecue chicken, green salad, Bush's baked beans, and corn on the cob!
The chicken was fabulous! Perfectly done. Juicy, and with an excellent smoke flavor. Along with the side dishes it made a fantastic meal.
Thus far my barbecue experiences have been very positive. It is fun and delicious. There is still much to learn, but I am growing in confidence. Perhaps it is time for a bit more adventure!
Sunday, May 18, 2008
Pork Shoulder Roast
Linda bought a four pound pork shoulder roast. It looked nice. I had heard and read that this was a forgiving piece to cook, so I was little concerned.
I estimated the usual hour per pound. I figured that it would take a bag of the Kingsford lump charcoal I had previously used. This charcoal is a bit more dense than the Cowboy brand I had first used. It seemed to burn a bit hotter. I prepped my chimney and got everything set up.
The meat I washed and rubbed with the Dollar Tree vegetable and olive oil blend. I then rubbed in my usual simple rub. That is some seasoned salt, table salt, garlic sea salt and black pepper. I then place the meat on the rack and inserted the remote thermometer.
I lit the lighting chimney and waited until the coals had a good heat. I then poured them into the fire box and spread them out. This layer was covered with unlit coals. I had the vents open all of the way. I returned every twenty minutes to add coals. Periodically I added soaked Kingsford Hickory wood chips.
I found the Kingsford chips to be a good value. It is a good sized bag for under four dollars. About the best price I have found. They seemed to work quite well, and burned long enough to provide a good smoke.
The timer had been set for two hours, at which time I turned the meat over and end for end. This exposed the end farthest from the fire to the fire for the second half of the cooking time. The internal temperature of the meat was about 120 degrees at this time.
I continued to monitor at twenty minute intervals. With about ten minutes left on the planned four hours the meat was 158 degrees internal. I applied the hair dryer to the coals for about two minutes, since I had added the last of the bag a few minutes before and wanted to be sure we reached target. It probably was not necessary.
The target temperature was reached at three hours and fifty eight minutes. 160 degrees. I removed the roast and wrapped it, to let it rest for twenty minutes.
I uncovered the roast and began cutting for serving. It was tender throughout. The color was good, and the smoke flavor delicate. I cut slices for some family members, as they preferred it served that way. I chopped quite a bit, anticipating several days of eating.
I did my barbecue spaghetti one day. Another I added the meat to a Rice-A-Roni Mexican dinner. It enhanced that meal a great deal.
On the whole I found the Pork Shoulder Roast to be a quite satisfying barbecue experience.
Tuesday, May 13, 2008
Beef Pot Roast
I really don't know cuts of meat. I do know when it looks good. This one looked very good, with a nice ratio of fat to lean. It had some bone, but not too much. Best of all, it was discounted because it expired the next day.
Today was the next day. I mixed garlic sea salt, seasoned salt (from the Dollar Tree), a bit of table salt and some black pepper in a bowl. After washing the meat I rubbed it with a blend of olive oil and vegetable oil I also found at the Dollar Tree. Hey, cheap is good. It's a discounted cut of meat! I seasoned the meat with my mixture, and slapped it on the barbecue.
My coals today were lump charcoal from K mart, because that is where I happened to be when I recalled that I needed charcoal. I hadn't looked around there before. They have some good stuff. Bags of hickory and mesquite wood chips. Things and stuff. I will be back.
I set my thermometer for 160 degrees, and fired up my coal starter chimney. I waited a bit longer before pouring the coals in the fire box this time. We did some grilled burgers a few days ago and I discovered that the fire was harder to manage when I didn't wait long enough for the coals to get going. It was a nice bed, with good ash and a workable distribution of heat. I added some more lumps and settled back with a Blue Moon Belgian White beer.
Once I had a solid fire going, even heat in the chamber, and the meat temperature was starting to rise, I went about my business for a little while. I estimated three hours to cook this roast, but scheduled four.
I periodically tossed in dry chunks of mesquite, since that is what I had left. I will probably be going with chips in the future, since they give me better smoke. Even so, these chunks worked out just fine. I turned the meat at an hour and a half. It was looking good.
The temperature inside the meat was hovering around 155 degrees after about two and a half hours. I had just thrown in the last of my charcoal, and I knew I had to finish with that. So, the hair dryer came to the rescue. I applied it off and on over fifteen minutes and easily achieved my target temperature at just about three hours of cooking. I ran the dryer on low for a minute or two at a time, then would let things just cook for about four or five minutes.
I pulled the roast out and covered it with foil to rest. I had seen this done on some YouTube videos, and gave it a try. Supposedly it allows the temperature to even out and the juices to settle. I don't know if that is the case, but when I uncovered this beauty it looked marvelous. I ate the first cut, and it was a winner.
Moist, tender, and beautifully done. The smoke flavor was distinct, but not overwhelming. I just cut it into serving chunks and we had at it. Served with a green salad. It was fabulous, I must say. I ate mine without any sauce at all. It was as close to perfection as I might hope.
There are some chunks left. We have plans to do a pork shoulder tomorrow, and we have a cooked chicken quarter left over from another meal that I might throw in to smoke a bit, as well. I have visions of chopped pork, chicken and beef blended and served on a bit of bread.
This is proving to be a lot of fun, and tasty, too!
Tuesday, May 6, 2008
Expanding horizons-
 Barbecue may be just the beginning. I was exploring the Internet and discovered a wealth of cooking information on Dutch Oven cooking. Chuck wagons, Scout gatherings, hunting lodges. There are tools (many of which have been used for centuries) and books. There is even a Dummies book set which includes some cast iron. (Those Dummies people are no dummies.)
This might have been an "oh, that's interesting" thing until I found people giving advice as to how to have these open fires anywhere. Yep, the old barbecue can be your fire box. Or, as one person recommended, an oil drip pan from the auto parts store. The bottom quarter of an oil drum could work. Or that back-yard fire pit that was just there to take the chill off of evening conversations in the back yard.
I am not yet ready to do this next step in outdoor cooking. I am still just getting started with the Silver Smoker. However, I see it as a logical next step, and it looks like fun.
On the whole, I think I am addicted to the smoke. And eating.
I think this will be fun.
Monday, May 5, 2008
Tri Tip Steaks-
Linda had purchased some nice tri-tip steaks. Everything I had read recommended a marinade, but I wanted to see just how the smoking process might affect a nice cut of meat without any preparation.
I got the fire up and running. The smoke chamber was at around 200 degrees when I introduced the meat. I really do want a better chamber thermometer, since this one is a small dial with color divisions and really does not provide much information. Anyway, as best I could tell I was starting at 200 degrees or so.
The new digital thermometer is a single probe. I have read of dual probes, but was not aware of them at the time Linda ordered this one. So, I selected a piece of meat in the midst of the others, and inserted the probe. I set the temperature for 165 degrees, as recommended by the thermometer manufacturer.
I maintained the fire by adding charcoal. Again, a mix of lump and biscuit charcoal. My smoke was produced by chunks of mesquite. My estimate based on the volume of meat and the thickness of the cuts was about an hour and thirty minutes to two hours.
After the hour and thirty minutes I found the temperature inside the meat was about 135 degrees. I turned the meat and stoked the fire. After another ten minutes I noticed the temperature was not going up. I added some more charcoal and applied a hair dryer to the air intake. Over the next fifteen minutes I achieved the target temperature and took the meat out.
On the whole, it was good. Not especially good, but good. I found the meat to be adequately juicy, but not especially so. I had done nothing to the meat, and the results were consistent with what I did not do.
In the future, I will definitely do a marinade. If I don't have time for that, I will definitely coat the meat with olive oil, and add salt, pepper, and some spices in a rub. Either of these will add flavor and improve the juiciness. I may also look for a bit more fat in the meat, as this was quite lean. It did prove quite tender, however.
I also plan to find a way to introduce more air at a steady rate. I saw a device made using a computer cooling fan that might just do the trick.
Another practice I will adopt is to light the next batch of coals in my chimney before introducing them to the fire box. I think I was losing some consistency in temperature by introducing cold charcoal to the fire box.
Until I can get some good wood to try charcoal/wood fires I plan to use the chips rather than the chunks. I get better smoke and have more control with the chips.
So, a learning experience, and another good meal. I hope to make the next tri-tip better than good. I want to shoot for fabulous.
Oh, and I really need to make sure I have some beer. For the cook. It is an important ingredient, and would have helped a lot.
I may buy a second thermometer like the one I have to use to monitor the chamber temperature. Together they would cost no more than a dual probe thermometer, especially since I already have the one.
The paint continues to burn off of the outer surface of the smoke box. I may have to get some high temperature paint to protect the outer surface from oxidizing. I may just use the fire bricks I saw in one YouTube video about barbecue in a Silver Smoker. I need to explore modifications that will aid in getting good barbecue consistently.
So far, I am very pleased with what I have learned, and look forward to the next adventure.
Friday, May 2, 2008
Barbecue Spaghetti-
So, the steaks were good. I had some left. I was already making spaghetti. Hmmmm.
I grabbed a chunk of meat of about six ounces, and also grabbed my cleaver. I chopped the meat up nice and fine.
Already in the pan was a dollop of butter, a dollop of olive oil, and most of a cup of Hunt's canned spaghetti sauce. I added the chopped meat and two table spoons of chipotle medium salsa. I let it all simmer as the noodles boiled.
Next I drained the noodles and put them on a plate, and poured my sauce over them. Over this a liberal sprinkling of parmesean and romano cheese. I only had the Safeway brand of cheese dust. I like their meat, but this cheese is just barely servicable. I usually add as much cheese as I can without making the meal too dry. I like cheese.
I took a bite. It was REALLY GOOD! For something I just threw together, it was very good, indeed.
Barbecue Spaghetti. Who woulda thunk!
Wednesday, April 30, 2008
Thermometer-
I poked around on the Internet, looking for a digital thermometer. I found one that had features and a price I liked, and sent the site to my wife. I was just suggesting that we needed something like the one I had found. It happened to be offered by Target in conjunction with Amazon.com.
A few days later I came home from work, and there was a package sitting by my computer. Cool! A digital thermometer. It was a bit over twenty bucks. Not bad.
Of course, we happened to be in the southern part of Santa Cruz county about a week later, and after lunch went to.... Target. The thermometer was there, and not surprisingly a bit cheaper. No shipping charges. Ahem.
The price of these things makes them very practical for most beginning barbecue cooks. From the stuff I have watched on YouTube (and I recommend studying barbecue on YouTube) lots of serious barbecue cooks with considerable experience also rely on these things.
Other forms of thermometers are also available, and for very little money. I will work with what I have right now, but may try other models from time to time. I currently have a small dial thermometer that gives me a reading of chamber temperature, but it is graduated rather generally. I think I might go for a larger dial and more accurate graduations in the not too distant future. At only five or six bucks, it seems a good investment.
Grillin' steaks-
The steaks were still in the freezer when my wife called. I got them out, but it looked like a lot of meat to thaw. When she got home, they were still ice cubes. I couldn't find the old defrosting plate we had somewhere. It was starting to get late.
I popped the steaks into the oven at 200 degrees. After an hour I could separate the pieces. I spread them around on the baking sheet to defrost a bit more while I got the coals going. They were big slabs of meat, but rather thin. They would cook fast on a hot fire. I wanted to get the temperature right so that I could cook without burning.
Using my chimney I got some lump charcoal going. Cowboy brand, from Home Depot. That stuff starts easily and gives a good initial heat. Since the meat was big (each of the three pieces were dinner plate sized slabs) I used the smoking chamber to grill. I spread the coals, and put biscuit charcoal in to add to the fuel. Once the heat seemed about right I spread the coals out and closed everything up to even out.
When I returned with the meat, I noticed a strange odor. The heat was warming the pipe frame that holds the whole barbecue together. These parts had not been heated this much during the burn-in of the Char-Broil Silver Smoker. I let the thing cook itself for about fifteen minutes, and the stench went away. I didn't know if the burn-in smell would impact the cooking, but I could wait to avoid the problem.
Steaks on. I didn't keep track of the time. I just put them in, and closed the lid. When it felt right, I opened up and checked. Just the time to turn. A little longer on the second side, as the coals had cooled a bit. I found that I could boost the heat by opening the fire box door with the smoke chamber lid closed. That way the heat and smoke in the chamber were not released, and the added oxygen stoked the coals.
I have been pleased with the Safeway Select meats. So far the cuts have been flavorful, and had just the right amount of fat. These were no exception. Tender and flavorful.
So, my Silver Smoker makes a good grill. I would recommend burning in the whole unit, and not just the fire box. Hot enough to burn off the stuff inside those frame pipes that is a bit unpleasant in the smoke department. On the whole, I really like this barbecue, and expect to enjoy it a great deal over the coming years.
I have seen some modifications on other units, and will consider some over time. Ways to regulate the heat, and ways to protect the metal to prevent untimely wear. So far, it has been great.
Sunday, April 20, 2008
Chicken, thighs and legs
Before I get to the chicken, I must describe what I am eating at this moment. I was planning on writing this, but a bit hungry. I went to the kitchen, and the last piece of chicken was sitting there. However, it is for my son, so I refrained from touching it.
Oh, but what's this? The last piece of that nice roast beef I did up on the barbecue! Yeah! I chopped it up and put it in a pan. Let's see. Rice wine vinegar, just a splash. OK, another splash. Some soy sauce. A dollop of A-1 sesame steak sauce. A bit of olive oil. Heat it up.
How to eat it? On toast! Two slices of whole grain bread, toasted firm and brown. A bit of olive oil. Now, spread the chopped meat on, thick. Too thick for a closed sandwich, so I have two open faced beauties to snack on. Fabulous!
Now, the chicken. Plump thighs and legs, thawed out last night. I want to begin doing meat I go and get just before the barbecue, but these were here and needed to be eaten. I just rubbed them with olive oil, and went to build the fire.
I used lump charcoal as the base. It starts easily, and smokes nicely. Once the bed was started, I built a wall of charcoal biscuits around it. Once I was getting some good heat, I put on the chicken. Just laid them out in the cooking chamber, with a bit of water in the drip pans for moisture.
Now for some smoke. I decided to try chunk mesquite this time. I put on three fist-sized chunks, dry. Partly due to time, I did not soak any before beginning. The chunks did not produce the amount of smoke the soaked-and-dry chips had, but still were satisfactory.
I fed the fire often, and refrained from opening the cooking chamber for forty minutes. At that time I checked temperature (around 350 degrees) and turned the chicken over. The two pieces nearest the firebox were cooking much faster than the rest, so I moved them to the other end.
After an hour and a half, I checked the meat temperature. The chamber had settled to about 250 degrees, and the meat was steady at around 160 degrees. People were hungry (that time thing) so I put the cooking grate into the fire box and grilled these pieces for several minutes with the lid down.
On the whole the end product was pretty good. I should not have grilled the two pieces that had cooked the most, being close to the fire during the early cooking. I got a little burn on these. Still good. Very good, in fact.
The least cooked piece was still done, but I think it could have used just a bit more time. In fact, I think the whole lot could have done no less than two hours and been the better for it.
We are not real wine drinkers, but we had picked up a bottle of Smoking Loon 2005 Viognier on the way home. We had walked by it, it was on sale, and I had no idea what a Viognier was. It came home with us, and proved quite satisfactory to our uneducated palates. Surprisingly sweet for a white wine.
What would I do differently? I think I would plan for a longer cooking time. At least two hours. I would also really like to get a digital thermometer that I can use to read the internal meat temperature remotely, from outside the cooking chamber. Especially for cooking pork and chicken. Something like this.
I do think building the fire a bit hot to start with worked well. I got the temperature up, and it was easier to control this time. I still want to build a fan assembly that can introduce a bit more air when I want to bump up the temperature.
A good cooking experience. With salad and baked beans (canned) the meal was quite satisfying.
Thursday, April 17, 2008
Research-
I could not find books on real home barbecue. They were all books on grilling. So, where did I go? YouTube!
I have learned a lot from YouTube, watching people share how they barbecue. Various equipment choices. Off-set smoker, upright smoker, Terra cotta smoker (made from planters), and good old Webber Grills used for smoking. Oh, and oil drums.
Dial thermometers. Digital probe thermometers. Remote reading digital probe thermometers. Infra red thermometers. Whew!
One person has a Silver Smoker, which has been modified to help it work better. Lined with fire brick and aluminum foil. New baffles to contain the smoke as long as possible. Good ideas, and I might just try them.
The idea I liked best was a twelve volt computer fan used to aid in temperature control. That is what I needed. I think I shall fabricate something that will help get the heat up. So, perhaps lining the firebox would be a good idea, after all.
Yep, this is fun. Tasty, too.
Smoked Beef Roast-
So, today we did a four pound round top roast from Safeway Select. It was a very nice looking roast, but I was not sure if it might not be too lean for smoking. However, being a novice has its advantages. I rubbed it down with garlic salt, salt, and pepper. I racked it on a v-shaped rack that sat nicely in a drip pan. Ready to go. I put it in the refrigerator for about an hour and a half, since it was too early to begin.
I planned for four hours. I prepped the Silver Smoker and got the fire going. For this one I pulled the food grates and set the roasting pan on the fire grate in the cooking chamber. This placed the racked meat in the center of the cooking chamber; not too high, not too low. I was just guessing that this would make any difference, but it seemed right.
The cooking chamber remained at 200 degrees pretty consistently over the four hours. I actually was wanting a bit more heat in the chamber, to get the center of the meat up to temperature. However, even with the vents opened all the way I only got up to 230 degrees at a few points.
I am measuring temperature at the grate, in the center of the cooking chamber. It is a simple dial thermometer, and I think I really will want to replace it one day with something more accurate. However, I think it will do for now. I still have a lot to learn, and going nuts buying equipment will not make me a better cook.
Or maybe it will. What do I know?
Anyway, it came out looking reddish brown, with a rich chocolate brown at the ends. I got it upstairs and we were ready to eat, so I cut into it. It was very nice inside. Juicy, with a bit of a smoke ring. It was done about a medium rare. There was some connective tissue that remained a bit tough to cut, so I cut around it. The dog liked the chewy bits just fine.
Oh, it was really good! The chips I had for smoking were mesquite, introduced from time to time along with a bit more fuel. They added a good flavor. I hope to experiment with other woods, both chips and chunks, over time. The mesquite was quite satisfactory.
As I wrapped up the left overs (about half was left after three people had their fill) I set aside some of the end bits to chop up. I made a mess of chopped beef and put it in a sealed container with a bit of soy sauce. I shall see how this is tomorrow. It is waiting in the refrigerator, hopefully getting better with time.
Thyme. I threw a bit of that in the water at the bottom of the drip pan. I didn't know if it would help, but it seemed a good idea. Just remembered that.
So, my second adventure went well. On the whole, this has been quite satisfying.
Sunday, April 13, 2008
First run-
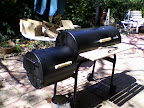
My guess was about two hours, but I planned to play it by ear. I didn't want to be the anxious neophyte and constantly open the cooking chamber, so I used a timer to keep myself in line. My vents were set at 1/4 for the upper and 1/2 for the lower.
After fifteen minutes I checked the temperature. My thermometer is attached to one of the cooking grates, so I have to open the lid a bit to check the temperature. It was good. I then added a handful of soaked hickory chips, and a handful of dry chips. We got smoke in a hurry, and it continued through the next fifteen minutes just fine.
So, I checked things every fifteen minutes, adding a bit of charcoal to provide fuel to keep up the temperature and periodically adding my smoke chips to keep up a good smoke. The Cowboy brand lump charcoal had a good scent, as well.
At an hour and a half I decided that things looked ready to test. The surfaces of the steaks had a nice brownish red patina. I pulled a steak from the box, cut off the end, and had a look. Good smoke ring. I tasted it, and decided that the Silver Smoker had been a great choice.
I called the family to come and get it. Beans, salad, and some very good steaks. I ate mine without any sauce. It was moist, and the fat was rich in flavor. The meat was fabulous. Oh, yeah!
Now these steaks had been about 3/4 inch thick before cooking, and were a bit less after cooking, but they held up well. I was concerned that pieces of meat that thin might not do well in a slow cooker. The were just fine.
Talk during the meal was of what to try next. I am thinking a pork shoulder. There was some talk of turkey. Maybe beer chicken. We shall see. It should be very soon.
Friday, April 11, 2008
Beer-
Beer is, of course, a common element of barbecue. I prefer full-bodied brews. American style beers are adequate, but I prefer more flavor.
My current favorites are Fat Tire (an amber ale), Blue Moon (a wheat beer), and Prohibition Ale (a most beery beer.) Santa Cruz Mountain Brewing produces a very nice amber, as well. I am also partial to Smithwick's Irish Ale.
I plan to include beer in my recipes, from time to time, as well as keeping a bit in the drip trays for humidification and flavoring. I hope to aid the cook with a brew or two during the cooking process, keeping safety in mind.
Comments on beer and barbecue shall be most welcome.
Perhaps that shall be another adventure, one day. Barbecue and home brewing. Yes.
Barbecue Beginnings
I love barbecue. I am not alone in this passion, and that is good. That means that multitudes are much more experienced than myself, and I love to learn.
It is said, “Barbecue is a destination.” The essence of this sentiment is to leave the cooking of fine barbecue to the experts with the proper equipment. I can accept that good barbecue is a destination, and I would love to visit more fine institutions and expand my mind, along with my waistline.
However, I presently am at home (or work) most of the time. I can’t explore the art of barbecue at work, so I must confine my experiments and adventures to my own back yard. I plan on plenty of destination barbecue in the coming years, but I also want to explore the art at home.
My birthday was this week. I saw a Pontiac G6 I rather liked, but my wife wisely redirected my focus to a barbecue. So, off to Home Depot.
So many choices! So many lovely choices! However, the budget dictated that I refrain from creating a backyard oasis with an island grill, hot and cold running everything, and copious amounts of beer. So, my eyes slid down the rows and shelves, and landed on what now sits in my back yard.
What I wanted to do was REAL barbecue, not just grilling. I found the necessary tool.
It is a Char-Broil Silver Smoker. (It is actually very black.) Yes! The price was right, at $159. A few extras (charcoal starter chimney, thermometer, charcoal and wood chips) and we were out the door for just a bit over $200. That, and considerable effort. Though packaged nicely, it is quite heavy.
It took several hours to build this thing. I say build, because “assemble” falls quite short of the task. The main chamber and the fire box were welded up, and the doors mounted. Just about everything else is up to the user.
Fortunately, the documentation is clear and adequate. I love the bubble packed nuts and bolts. Very clearly laid out, and easy to keep track of during assembly.
The instructions warn that the assembly should have two people, due to the weight. I am a relatively large person, and strong enough for the task, so I went solo. Exercise caution, if you go this route. To reduce weight I removed the components from the package right from the back of the vehicle, and moved them a bit at a time to the assembly area.
This product is well made, and the design allows the novice ( in this case, me) to build the smoker quite easily. I took my time, and finished in about two hours. The instruction sequence allows for surprisingly easy assembly. The assembler is directed to orient various parts in ways that allows components to sit on the ground, or on each other. No holding up heavy parts while you try to align screws and attach bolts.
The Char-Broil Silver Smoker is a design previously manufactured by the New Braunfels Smoker Company. It is an off-set smoker, having a smoke box attached to the side of the main chamber. Indirect heat and smoke cook the meat in the main chamber.
New Braunfels is a town in Texas. If you would like to see the town, I happen to have a slide show video on YouTube. Check out the mlockridge channel.
So, I finished assembly last night, and today I fired it up. Well, first I cleaned it, rubbing off any residual adhesives from the stick-on label with alcohol. I then oiled the inside with vegetable oil. Then I loaded the starter chimney with charcoal, and two wadded-up pieces of newspaper.
The charcoal I used is a lump charcoal by the brand name of Cowboy. Rather than the ground up and compressed charcoal biscuits, it is still bits of wood charcoal. It started beautifully. Once it was ready, I poured the burning charcoal onto the fire grate in the fire box, and arranged the coals to keep up a good burn.
Most of today I experimented with adjusting the vents to control the heat. This was a break-in burn, so no cooking today. I tossed in some of the hickory chips I had purchased, and was amazed by how much smoke a few chips will generate. None had been soaked in water, so they burned up pretty quickly.
The rate of fuel consumption seemed reasonable. I figure that I will want to start the fire about a half-hour (or a bit more) before introducing the meat to the cooking chamber. My first cooking run should be this Sunday.
This unit has considerable flexibility. If you want to grill just a bit of meat, the fire box can serve as a small grill. A grill grate is included. To grill a large amount of meat, the main chamber can be used as well. Fire grates are included so that the whole unit can be used as a grill.
As a smoker, it has a good capacity. A small turkey could be smoked in this unit, and probably will. However, I plan to work my way up to that.
So, a new adventure has begun. I will share it here.
Subscribe to:
Comments (Atom)


